Installing DHCP
Service on your Windows NT server
DHCP (Dynamic Host Configuration Protocol) offers a painless way to manage
TCP/IP addresses on your network. Fortunately, setting up this protocol on your
Windows NT server is also an easy process. In this article, we'll show you how
to configure server-side DHCP support.
Implementing DHCP on your Windows NT server
First, you'll design the basic layout of your DHCP system, as we discussed in
the preceding article. Then, you'll be ready to install DHCP on your server. The
protocol ships as one of Win-dows NT's services, so you don't need to buy any
additional software.
To install DHCP support on your server, right-click on Network Neighborhood and
select Properties. When the Network window appears, open the Services tab and
click the Add button. Find and select Microsoft DHCP Server in the list of
available services and click OK. (The install process may ask for your Windows
NT CD.) Microsoft DHCP Server will now appear in the list of avail-able
services, as shown in Figure A. Click OK to dismiss the Select Network Service
dialog box and then restart Windows NT to load DHCP.

Figure A
You can install DHCP as a service in Windows NT.
Configuring DHCP
When your server reboots, you must configure it before the server can start
passing out TCP/IP addresses with your new protocol. To begin, open the Programs
menu's Administrative Tools (Common) submenu and select DHCP Manager to open the
screen shown in Figure B.

Figure B You configure DHCP using the DHCP
Manager.
Your first step is to create a DHCP Server on your NT server.
Select Add... from the DHCP Manager's Server menu to open the Add DHCP Server to
Server List dialog box. Enter the TCP/IP address of your server in the DHCP
Server text box and click OK. The server will now appear in the DHCP Server's
window.
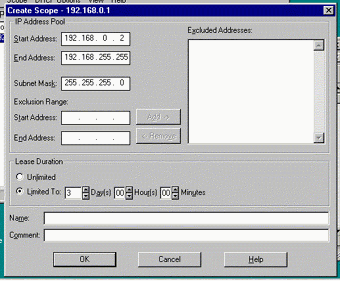
Next, you must create a scope for your server. Scope is Microsoft's terminology
for a range of TCP/IP addresses. To begin, select Create from the Scope menu to
open the Create Scope dialog box, shown in Figure C. Here, you'll provide all
the information for the range of addresses you want to use for your
workstations. Enter the TCP/IP address that begins the range in the Start
Address text box and enter the closing TCP/IP address in the End Address text
box. In the Subnet Mask field, enter the subnet mask for your network. (The
subnet mask controls the total number of available addresses for the range of
addresses you specify.)

Figure C These controls create a scope, or a range of TCP/IP
addresses.
If you want to exclude a particular address within the scope you're creating,
enter the address in both the Start Address and End Address text boxes under the
Exclusion Range section. If you want to exclude an entire range, enter the
range's starting and ending addresses in the Exclusion Range Start Address and
End Address text boxes. Click Add to place your excluded address or range in the
Excluded Addresses list box. Your DHCP server won't use any addresses in this
list.
Next, you must specify the length of the DHCP lease your server will issue to
clients. If you want to make the lease length unlimited, select the Unlimited
radio button. In all other cases, click the Limited To radio button and select
the length of the lease expressed in days, hours, and minutes.
NT's default DHCP lease length is three days. Your decision to make the lease
longer or shorter should be determined by your network configuration. Shorter
leases increase network traffic because your clients will ask for new addresses
more often. This approach may be desirable if you have a limited number of
addresses and many clients who need them. In this scenario, inactive clients
don't tie up valuable addresses. You may also want leases to be available faster
if you have many clients, such as notebooks, that travel frequently from
subnetwork to subnetwork.
Longer leases reduce network traffic due to a lower number of renewal requests.
If you have plenty of addresses to go around, you can let your clients keep
their leases for an extended period. This approach also increases the overall
stability of your network and makes details easier to track.
You can create a name for the DHCP scope and add comment information by filling
out the appropriate fields. After you've made all your changes, click OK to
close the Create Scope dialog box.

A little more info
Windows NT lets you customize options for your DHCP scope and clients by simply
adding information about things such as DNS servers, Time servers, and Routers.
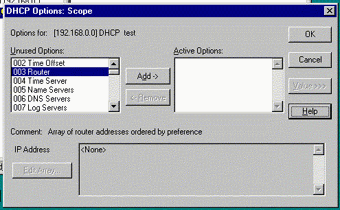
To do this, select Scope from the DHCP Manager's DHCP Options menu. When you do,
your workstation will display the screen shown in Figure D. To add a service,
select it from the Unused Options list and click Add. Then, click the Value
button to set an address or value for the option.

Figure D You can add customized information for your DHCP
server and clients.
You can also use the DHCP Manager to permanently assign addresses to
workstations on your network. To do so, select Add Reservations from the Scope
menu to open the Add Reserved Client window. Enter the TCP/IP address you want
to reserve in the IP Address text box. Next, enter the Media Access Control
(MAC) address of your workstation's network card in the Unique Identifier text
box. You can also opt to enter a computer name and comment in the Client Name
and Comment text boxes. Click Add when you've finished making your changes.
Once you've created your DHCP scope, just restart your Windows NT server and it
will be ready for use with DHCP. The final phase of your project is setting up
the DHCP protocol on your workstations.
Managing passwords
Managing passwords can be a tedious task.
Password Keeper for Windows 95/NT, a freeware utility, can make this chore
easier by storing your frequently used passwords.
You can store, edit, and print password information from each password file,
which can contain up to 500 account entries. Password Keeper stores data files
in an encrypted format to prevent unauthorized users from accessing and viewing
them. You can also copy passwords to the Clipboard and paste them into other
login programs. You can download Password Keeper at www.execpc.com/~sbd/PASSKEEP.ZIP.
Viewing configured workstations
After you've configured your servers and
workstations to use DHCP, you can use DHCP Manager on your servers to see TCP/IP
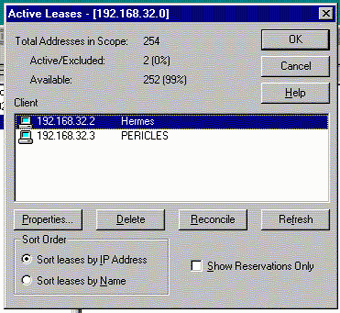
information about client leases. To access this information, select Active
Leases from the Scope menu. You'll then see the Active Leases screen shown in
Figure A.

Figure A
You can use this tool to view which clients have what addresses. The DHCP
clients on your network appear in the Client list box. You can sort the list by
IP address or name by clicking the appropriate radio button. If you want to view
detailed information about a client's configuration, highlight the client's name
and click Properties.


