
Financial Ltd
|

Directory Enquiries

Currency Converter

Train Tickets


|
| |
Use Word to create a business
card for your consulting gigs
Most IT professionals with full-time jobs also do some consulting on the
side. As long as those projects don't interfere with our "day job"
duties, our employers usually don't mind since consulting helps keep our skills
sharp.
Unfortunately, many of us miss opportunities to get new consulting business
because we don't have our own business cards. When you meet someone who might be
interested in hiring you to do a special project, do you pull out the business
card from your day job, scratch out the office phone, and then handwrite your
home number and e-mail address on the card? If so, your potential new client may
think it's a little tacky.
You'd make a better impression if you had a small stock of business cards just
for your consulting business. You could spend a fair amount of money to have a
printer create a high-quality card for you, but you usually have to order a
minimum of 500 or 1,000 cards. Here's a cost-effective alternative. Go to an
office supply store, spend about $10 on a box of pre-perforated sheets of
business cards, and create your own business card in Word. The whole process
will take you less than 10 minutes.
 Summary of this tip Summary of this tip
Here's the quick reference guide to creating business cards: Buy a box of
business card stock. Use Word's Envelopes and Labels feature to create a table
of blank cards. Design the first card, then copy that table cell to the
remaining slots on the page.
Fast and easy does it
Creating a business card in Word is easy. You can print your cards on any laser
printer, and you can print only as many as you need. If your phone or e-mail
address changes, you don't have to throw away a box full of cards. You just
print another batch. Here's how:
 |
Go
to the office supply store, and buy a box of pre-perforated business
cards. A box of cards should run around $10. You'll need to have the
product number handy when you get ready to design the card. (Word has
built-in templates for Avery and MACO brands.) |
|
Create
a new document in Word. |
|
Open
the Tools menu, and select Envelopes and Labels, as shown in Figure
A. |
|
When
the Envelopes and Labels dialog box opens, click the Labels tab. |
|
Click
Options, and then locate the appropriate item in the Product Number
section, as shown in Figure B. |
|
When
you've located the correct product, click OK. |
|
At
this point, you could simply start typing your information in the
available space in the Address window, as shown in Figure C,
but don't do it. You can't format the text in this window. |
|
Instead
of typing your data in the Address section, click New Document. |
|
Word
will create a table that's preformatted to print on the business card
forms you selected. Now you can get fancy with your formatting, as
shown in Figure D. Enter and format the information you want on
your card. |
|
After
you get the card to look the way you want, select the contents of the
first table cell, and press [Ctrl][C] to copy it. Then move to each of
the remaining cells and press [Ctrl][V] to paste the card into each of
the slots. Figure E shows the print preview of what my sample
card will look like. |
Figure A
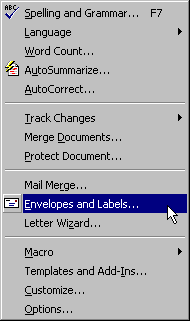
Start by choosing Envelopes and Labels from Word's Tools menu.
Figure B
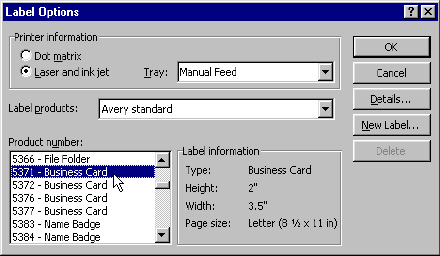
Select the appropriate product from the list and click OK.
Figure C
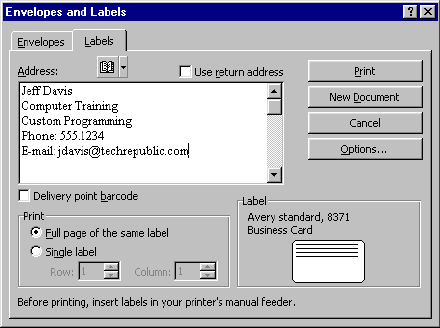
You could enter the text for your card right here. However, this
dialog box won't let you format the text. Instead, click New Document.
Figure D

After you create the new document, enter and format the
information you want to print on the card. (You can also insert graphics at this
point.)
Figure E
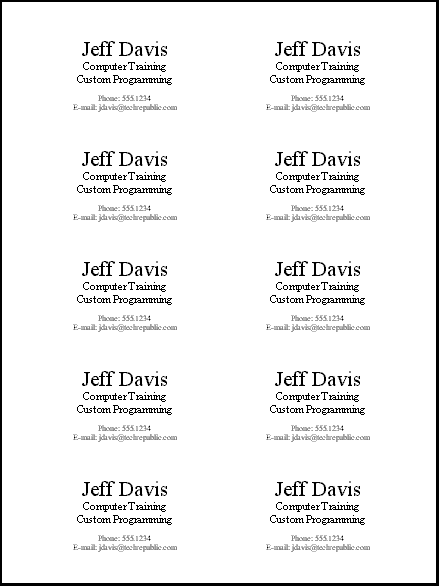
Here's what my page of sample cards looks like in print preview.
Print on plain paper first
Here's another tip: After you've designed your card and copied it to all the
slots on the page, print a copy on plain paper before you put your
pre-perforated business card stock in the printer. Then lay the plain paper on
top of the business card stock to make sure everything is going to line up
properly.
Be careful separating the cards
Although laser-printed cards are cheap and easy to create, they obviously aren't
going to be the same quality as business cards from a print shop. For one thing,
the edges of the laser-printed cards are going to show the small perforations.
To avoid ragged edges, be sure to bend the sheets back and forth several times
before you pull the cards apart.
If you'd like to share your tips or comments about creating
laser-printed business cards, please post a comment using the Feedback
form or send me a note.

|