NDS for NT properties added to User objects
NDS for NT not only creates new objects in your NDS tree, it also extends
existing User objects and adds new properties to them. Select a user in your NDS
tree, right-click it, and select Details. When the User Properties notebook
appears, scroll down to the bottom of the screen. You'll notice two new tabs in
the notebook: Domain Access and Domain User Settings.
As the tab name suggests, the Domain Access properties window helps you manage
the User's Domain group memberships, as shown in Figure H. The Group
Memberships pane shows the domains and groups to which the user belongs. You can
add the user to a domain or group by clicking the Add button. Then, choose the
object you want the user to join. To delete a user from a group or domain, just
highlight the group and click Delete.
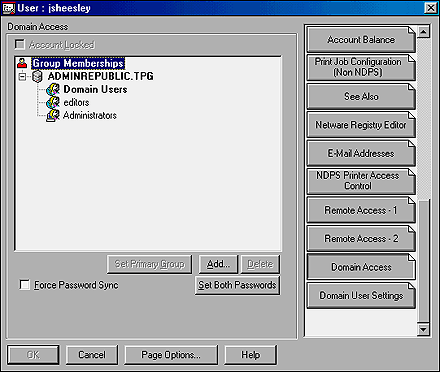
Figure H The Domain Access window allows you to control the user's access
in NT domains.
When a user is a member of a domain, that user must also be a member of at
least one global group within that domain. The User object must always have one
global group designated as its primary group. You can distinguish the user's
primary group in NDS because the primary group is displayed in bold type.
If you want to set another group as the primary group, select the group from the
list. You'll then notice that the Set Primary Group button becomes available.
Click that button, and NetWare Administrator will display the new primary group
in bold to indicate the change. The former primary group will appear in the
regular type style.
This window also allows you to synchronize the user's password in both the NT
domain and in NDS. You can't see the current password, but you can change it to
whatever you want. To set the password, click the Set Both Passwords button.
Then, just type the new password twice and click OK. This makes the passwords
the same but doesn't force the user to keep the passwords the same in both the
domain and NDS.
To make sure that the passwords remain the same, select the Force Password Sync
check box. When you do, the Set Both Passwords button becomes unavailable. To
change the passwords in this case, you must go to the Password Restrictions
property window of the User object.
Finally, if you've enabled Intruder Detection and the user has failed to log on
properly within the threshold you've specified in the Intruder Lockout window
(thus triggering a lockout), you'll notice a check mark in the Account Locked
check box. To re-enable the account, deselect the check box. Double-check the
Intruder Lockout tab in NetWare Administrator to see if the Account Locked check
box is selected there. You may need to deselect it there as well.
If you click the Domain User Settings tab, you'll see the screen shown in Figure
I. This tab consolidates information from several screens in NT Server's
User Manager for Domains. If you've used User Manager for Domains, you'll
recognize the different areas of this window immediately. This tab will make it
easy for you to administer users without having to use NT's User Manager for
Domains. You can perform the same tasks while inside NetWare Administrator.
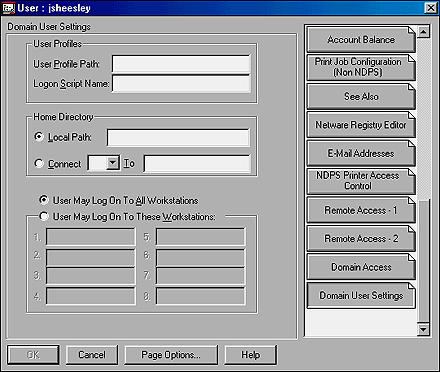
Figure I The Domain User Settings tab consolidates information from User
Manager for Domains.
The User Profiles and Home Directory boxes contain the same information you'd
see by clicking the Profile button while browsing a User object in the domain
with User Manager for Domains. The User Profile Path field contains the path
that points to the location on the NT server where you've stored any roaming
profiles. The Logon Script Name field displays the name of the logon script that
runs when a user connects to the NT server. Don't confuse the settings on these
fields with the logon scripts that run when you connect to NDS—or with the
path where you've stored profile information if you're running ZENworks. You
don't need to specify that information here. Likewise, you don't have to specify
a path to the home directory in the Local Path field if the User object's home
directory resides on a NetWare server.
The User May Log On To option correlates to the information you find when
clicking the Logon tab while browsing a User object in the domain with User
Manager for Domains. This setting allows you to restrict the workstations a user
can use to access the NT server. The default All Workstations allows the user to
access the NT server from any workstation on the network. You can limit the
user's logon locations by selecting the User May Log On To These Workstations
radio button and then entering the names of the workstations in fields that
become available. You can enter up to eight available workstations.
These options only affect NT servers in that domain. Don't confuse these
settings with the ones in the Network Address Restriction window. Limiting a
user's access to a domain in these fields will not block the user from accessing
NDS. If you want to do that, you must use the Network Address Restriction window
in NetWare Administrator. Whereas you can only limit logons using a
workstation's name in NT, the Network Address Restriction window allows you to
block logons using several protocol settings—right down to the MAC address
level.
Conclusion
NDS for NT 2.01 adds some important new objects to your NDS tree. It also adds
some properties to your User objects. After you understand what these additions
are and how they work, you can more effectively administer your mixed NetWare
and NT network using NDS for NT 2.01. In this Daily Drill Down, we've introduced
you to some of the NDS objects and properties associated with NDS for NT 2.01.